Managing Site Index
You must request this module to be activated on your account.
Setting Up Your Site Index
Step 1:
Select "Site Options" in the left navigation menu under "Site Management".
Step 2:
Select "Show Site Index Link in Header" and/or "Show Site Index Module on Homepage".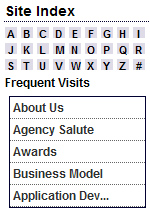
"Show Site Index Link in Header" - This will display a link throughout your entire Web site along the top in the header.
"Show Site Index Module on Homepage" - This will display a module on the right side of your Web site on the home page. (See image of example module on right.)
Step 3:
Select the "Approve New Entries" link in the left navigation menu under "Site Index". Initially, all pages and directories will appear in this listing with a red and green button to the left of it.
Step 4:
Select the red button to not allow a page or directory to appear in the Site Index. Select the green button to allow that entry to appear in the Site Index. In this list, you may see pages or directories that are still being built and are not live. You may either disregard them at this time and not select the red or green (this will leave the page/directory as an entry in this area), or you may select the red button so that it does not appear in the site index.
Step 5:
Once you have completed going through the list, select "View Homepage" in the left navigation menu under "Content Management". Then select the site index link in the header or a letter in the module in the right column to view the entries in the site index.
Step 6:
In order for the public to see your Site Index, you must publish your entire Web site.
Customizing Your Site Index
To customize your site index, go to "Manage Site Index' under "Site Index" in the left navigation menu.
Change the Title
To change the name of the site index in the header of your Web site, update the "Site Index Title" and click "Update Site Index Title". View the homepage to see the update.
Add Cross-References
The "Add Cross Reference" Option next to all pages and directories enables you to add a cross reference to all your pages/directories.
For example, if you have a page titled "Water Conservation" and your users might search for this page under "Saving Water", you can add a cross reference of "Saving Water" to the "Water Conservation" page.
Select "Add Cross Reference" next to a directory/page name, and then type the name of the cross-reference in the blank field provided and select 'Save'. Cross references will automatically appear in the site index if the parent reference is selected as green, "show", in the manage site index area. Cross references will not appear in the site index if their parent reference is selected as red, 'hide', in the manage site index area.
Maintaining Your Site Index
After you have built your initial Site Index, you can approve new entries by selecting 'Approve New Entries' on your left navigation menu under 'Site Index'. The "Approve New Entries" area enables you to view a list of all new pages and directories in your site before they are entered into the Site Index. Select the status of each item: Show or Hide by clicking the green/red button to the left of that item. If an item is set to "Show", then it will appear in the site index on your Web site. If an item is set to "Hide", then it will NOT appear in the site index on your Web site. Once you select a status, it will then be listed in the "Manage Site Index" area.